Show Me the Views

At this point, I feel like my blog has become a place to store solutions to technical issues that have caused me frustration. Definitely not my intent, but it is what it is.

This week I wanted to do something I thought should be pretty straightforward: dump/export all of the views from a specific MariaDB/MySQL database. I only wanted the views, no tables, none of the data, just the views. There were several partial solutions on other websites, Stackoverflow replies, and from ChatGPT, but nothing I found was a complete solution. The following was my final solution:

mysql --user=root \
      --password=password \
      --host=localhost \
      --skip-column-names \
      --batch \
      -e "SELECT table_name FROM tables WHERE table_type = 'VIEW' AND table_schema = 'the_database_name'" \
      INFORMATION_SCHEMA | xargs \
mysqldump --user=root \
      --password=password \
      --host=localhost \
      the_database_name > the_database-views.sql

Lastly, don’t forget to update both hard coded instances of root, password, localhost, and the_database_name with your actual MariaDB/MySQL username, password, host, and database name.

If you have a better solution, please feel free to let me know and I will update this post accordingly.

Docker Desktop for Mac Won’t Start?

Docker logo

I have been using Docker Desktop for well over five years with very few problems besides the typical host-to-container mount performance issues. After a recent upgrade to Docker Desktop, I was surprised to notice that Docker Desktop would no longer start. It just reported a “Docker Desktop starting…” message and wouldn’t continue.

I tried the typically suggested approaches:

  1. Checked to ensure I was running the latest build of Docker Desktop
  2. Via the Docker > Troubleshoot menu
    • Clean / Purge data
    • Reset to factory defaults
    • Uninstall
  3. Reinstall Docker
    • Remove Docker from /Applications and empty Trash
    • Restart the computer
    • Reinstall Docker Desktop for Mac

Finally, after about two hours, a post on forums.docker.com by zcqian put me on the right track, so I wanted to promote it, along with some refinements and my complete solution (try parts or the complete procedure).

  1. Restart the computer, and make sure Docker is not running. If it is trying to start, then stop it and close it.
  2. Open your Applications folder and delete Docker, then empty the Trash (or brew uninstall docker).
  3. Open Terminal and type:
    rm -rf ~/Library/Group\ Containers/group.com.docker
    rm -rf ~/Library/Containers/com.docker.*
    rm -rf ~/Library/Application\ Support/Docker\ Desktop
  4. Download Docker Desktop again, and copy Docker to your /Applications folder (or brew install --cask docker).
  5. Open Docker.

With any luck, you will now be back up and running again. Feel free to leave a comment if these steps change over time, and I will update this post accordingly.

Application Loader missing from Xcode 11

Two weeks ago, I happily upgraded my Macbook Pro to macOS 10.15 (Catalina), which worked out well. As expected, it feels like a solid, stable operating system, and the update was painless.

Some of Apple’s tooling was also upgraded, including Xcode 11.1. Today I needed to update one of our iOS applications, and as usual, I fired up Xcode > Open Developer Tool > Application Loader. Where is Application Loader? Am I tired? Nope… it’s gone.

From xCode 11 Release Notes:

Xcode supports uploading apps from the Organizer window or from the command line with xcodebuild or xcrun altool. Application Loader is no longer included with Xcode. (29008875)

Well, to hopefully save someone else some painful internet gold mining, you now have two options:

1. If you want to use a GUI you can use the Apple Transporter application, which does the same thing only prettier.

2. If you want to use the command line, Cœur posted this on StackOverflow:

xcrun altool --validate-app --file "$IPA_PATH" --username "$APP_STORE_USERNAME" --password @keychain:"Application Loader: $APP_STORE_USERNAME"

xcrun altool --upload-app --file "$IPA_PATH" --username "$APP_STORE_USERNAME" --password @keychain:"Application Loader: $APP_STORE_USERNAME"

Happy app uploading.

New .dev gTLD

In 2017 web developers worldwide were caught by surprise when Google announced that Chrome 63+ would force HTTPS (via a preloaded HSTS header) on all .dev domains. This move was frustrating to many developers because .dev names were routinely used during the local development process, and now, unless you want to install an SSL certificate, that practice would no longer work. For example, if I was creating a new website for https://mattsimpson.ca, I previously would have used an unregistered, locally routed, mattsimpson.dev name on my computer during development, but now I would have to use something else. But what?

Well, it turns out that Mike West at Google kindly suggested a better standard, an official standard, where *.localhost is actually routed to localhost, and aptly named “Let ‘localhost’ be localhost.” This brilliantly simple standard would also negate the need for developers to, in many cases, manually modify their local /etc/hosts file in order to use a new local virtual host.

Besides the fact that this take-over-on-squatted-territory was an inconvenience to so many developers, I genuinely applaud Google’s efforts to enforce HTTPS where it can, and I appreciate the leadership demonstrated by providing a better technical solution for web developers.

All this to say, the .dev gold-rush is on now. Get yours. I’ve picked up https://mattsimpson.dev and also a few other nice ones, including a brilliant one for my daughter Myer (https://myer.dev), who will have the coolest domain if she ever chooses to become a developer in the future.

Trouble with Data Roaming on DTEK60?

If you happen to be a roaming Telus customer that has a BlackBerry DTEK60 (or potentially other models), and you’re getting a bit frustrated because your mobile data is not working with an error something like this:

Unable to Establish a Wireless Data Connection.
Touch to Open APN Settings
Cause: UNKNOWN

The solution (in my case) was to create and use a new APN other than the default. To do this:

1. Go into Settings
2. Touch, More
3. Touch, Cellular networks
4. Touch, Access Point Names
5. You will likely see two existing APN’s in this list. Create a new APN for isp.telus.com. Yes, even if you already have one.

To creating a new APN click the + sign at the top, and the only two required field values you need are:

Name: It'll Work Meow (or whatever you want).
APN: isp.telus.com

Once that new APN is created, select it. You should be good to go.

Vote with my feet, Tesla Model 3

Tesla LogoPre-orders of the Tesla Model 3 opened today at 10:30PM EDT, one full hour before the car was even unveiled by Elon Musk. The Tesla website was under heavy load before starting to automatically redirect all traffic to the launch event site, but I got an order placed by about 10:45PM!

It may seem a little odd to pre-order a car without having actually seen it, but I wanted to make a few points about why I would do this.

First and foremost, Tesla without a doubt understands technology, software, and user experience better than any other car manufacturer on the planet, and a sight-unseen pre-order is my ever-so-small way of demonstrating my appreciation of their commitment to design and engineering.

Secondly, beyond the marketability of creating a car that is better for the environment I believe Elon Musk and Tesla genuinely want to change the world with this. In other words, I don’t sense that this is only for the money, there is heart in this. It has also been an excellent strategy to create high-end luxury electric vehicles (Roadster, Model S, and Model X) that are bought-and-paid-for by the top income earners, and then use that revenue stream to build something else amazing that can be mass produced a lower cost.

Thirdly, I gained a huge amount of respect for Tesla when they open sourced their entire electric car patent library, which also demonstrated to me that they’ve got heart in this.

Lastly, it was a pretty safe bet that the Model 3 would be amazing, and I am now happy to report that I certainly wasn’t disappointed. It’s absolutely beautiful.

Tesla Model 3

Red Tesla Model 3

Tesla Model 3 Interior

Tesla Model 3 Interior

Tesla Model 3 x 3

Tesla Model 3 x 3

In addition to being beautiful, Elon Musk presented limited, but impressive specs for a $45,000CAD vehicle:

  • It has a 5-star safety rating in every category.
  • It’s FAST, even the base model will do 0-100Kmph in less than 6 seconds (finally something to complete with my Mini Cooper S JCW).
  • It will do a minimum of 350 kilometres on a single charge, but I expect it will be even higher by 2018.
  • It comes standard with the auto pilot hardware.
  • It seats 5 adults comfortably.
  • The roof is 1 continuous pain of glass.
  • It has front and rear trunks, and more cargo capacity than any gasoline car.
  • It comes standard with super charging equipment (fast charging).

Other interesting fun facts Elon discussed include:

  • They will have 7,200 super charging stations, and 15,000 destination chargers world-wide in 2017.
  • There will be 441 Tesla locations by end of 2017.
  • Their vehicle factory can make 500,000 cars per year.
  • The Gigafactory is fully operational, and is the worlds largest producer of lithium ion cell batteries. This building also has the largest footprint of any kind in the world.
  • Deliveries for the Model 3 are expected to begin at the end of 2017.
  • There were 115,000 other people like me who pre-ordered the Model 3 in the last 24 hours before it was revealed.

Good for Tesla, better for the planet, and fun for my family. I’m looking forward to getting my Model 3 in 2018.

Christmas Projects 2014: Raspberry Pi PBX

Preamble

I was lucky enough to take two full weeks of holidays over Christmas and New Years this year. It was magnificent and completely rejuvenating, despite the fact that everyone in my house was sick with one or more ailments throughout. In fact being sick and stuck at home may have in fact been just the excuse I needed to indulge in a few geeky back-burner projects.

Project 2: Raspberry Pi PBX

I have been running Elastix for years. Elastix is a top-notch open source project that glues together many other open source telephony projects (i.e. Asterisk, FreePBX, HylaFAX, and many more) into a single distribution built on top of CentOS. This setup has worked flawlessly for years, but I had an idea I wanted to try out… build a basic PBX phone server on a $35 Raspberry Pi computer.

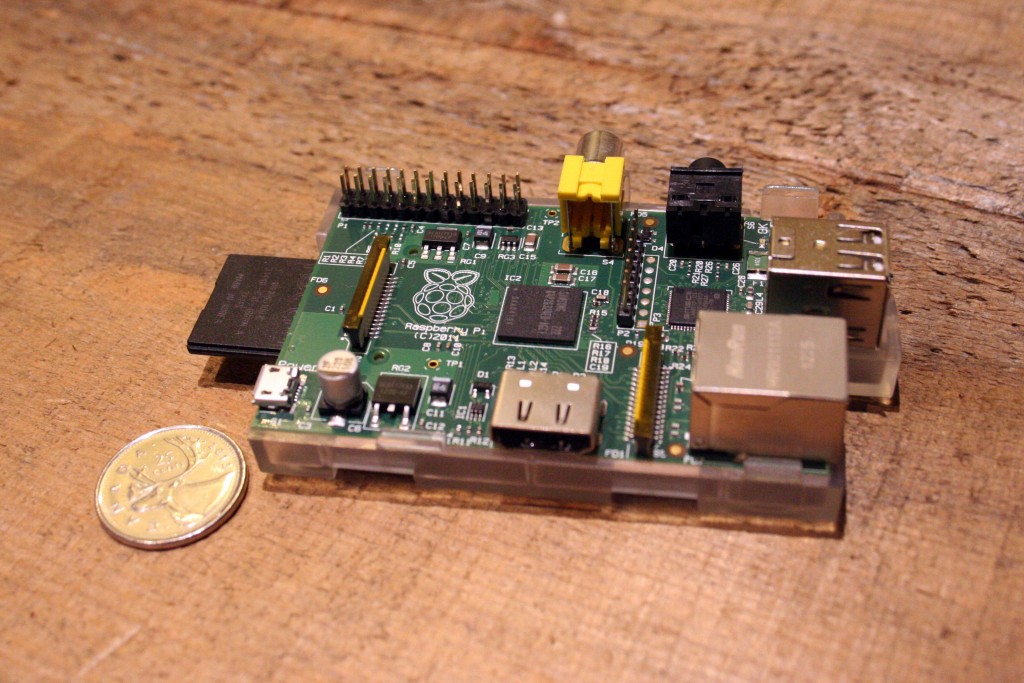
My project: use this amazing little Raspberry Pi to run my home phone system.

Raspberry Pi

Well as it turns out, this project was a resounding: SUCCESS

I had most of the equipment around the house already, here is my setup:

Raspberry Pi – 1st Generation.
Lexar Professional 16GB Class 10 SD Card – For Raspberry Pi storage.
RasPBX – A Raspbian based Linux distro with Asterisk, FreePBX, HylaFax, etc.
Aastra 480i CT – A decent IP phone with a cordless handset.
Polycom SoundPoint IP 335 (x2) – Really great sounding IP phones.
Cisco SPA122 ATA – Connected to a fax machine.
NetGear ProSafe PoE Switch – 24 port Power over Ethernet to power the phones.

Also useful may be the layout of the network:

phone-network-diagram
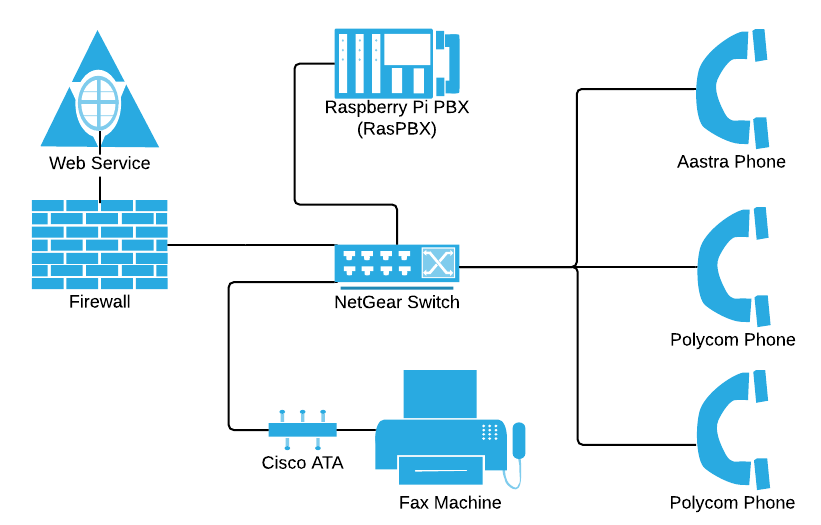
So the Raspberry Pi, the three IP phones, and the Analogue Telephone Adapter are connected through the NetGear switch. Additionally the three IP phones are powered by the switch (PoE), which is extremely nice because you don’t need a big ugly power adapter plugged into each of your telephones.

To configure Asterisk, RasPBX comes with a very slick web application called FreePBX that allows you to setup and maintain your trunks (linkages to your VoIP provider), telephone extensions, inbound call routes, outbound call routes, and much more. You can get really fancy with this stuff, and it’s pretty fun to think of potential uses. In terms of VoIP providers I have been using Unlimitel (owned by Primus Canada Inc.) for 7+ years now, and have nothing but great things to say about their service. They’re not fancy, but they certainly know what they’re doing.

When I started this project I went into it with the expectation I could make it “work”, but that it probably would not be something I could rely on as a phone server. Needless to say that after 3+ weeks of this being fully operational without any issues, this setup has exceeded all expectations and cost less than $50.

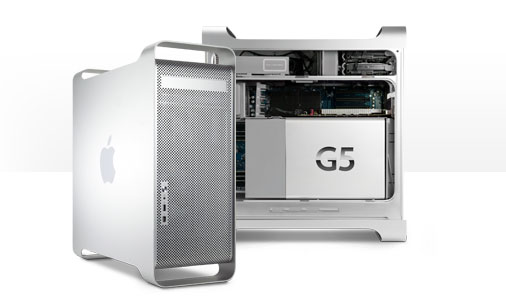
Also interested in Project 1: PowerMac G5 Linux Desktop? Read on…

Christmas Projects 2014: PowerMac G5 Linux Desktop

Preamble

I was lucky enough to take two full weeks of holidays over Christmas and New Years this year. It was magnificent and completely rejuvenating, despite the fact that everyone in my house was sick with one or more ailments throughout. In fact being sick and stuck at home may have in fact been just the excuse I needed to indulge in a few geeky back-burner projects.

Project 1: PowerMac G5 Linux Desktop

Apple PowerMac G5When I started working at Queen’s University 11 years ago I was graced with a new Apple PowerMac G5 desktop to work with. While it is long passed its’ prime in the Apple world, this machine with a dual 1.8Ghz G5 processor and 6GB’s of RAM will run Linux without breaking a sweat. It’s still decent hardware.

My project: turn this beautifully designed 11 year old relic into a completely usable Linux desktop computer for light usage.

As you can probably guess, projects like this can go South. 16 hours, several *buntu installations, and a Debian 7.7 installation later, project status: FAIL

This particular PowerMac G5 has an NVidia GeForce FX 5200 graphics card, which absolutely will not work reliably with PowerPC architecture. The reason I think I sunk so much time into trying different things is that it doesn’t fail outright, it just fails in different ways between different versions of different Linux distributions (i.e. screen flickers, text disappearing, white boxes covering certain dialogs, etc.).

All is not lost for 2 reasons:
1. I am apparently stubborn and have ordered an old ATI Radeon 9600 XT for this machine, which appears to have a functioning driver available. I will update later to confirm.

Update: No, the ATI Radeon 9600 XT does not work. Waste of money. Boo. I’m open to suggestions if someone reads this. Hum… Should I install Mac OS X 10.5, or use the thing as a coffee table? That’s pretty much where I’m at.

2. I have a new love and respect for Debian. What a great operating system.

Next – Coming Soon – Project 2: Raspberry Pi PBX

Displaying Dates Using User Selected Timezones in Laravel 4

Let me start by saying, you can safely stop worrying about user selected timezones if you are using Laravel 4+. I just spent a few hours trying to determine what was generally the most accepted method to store and display dates using a users own timezone. As it turns out, it is way too easy. So much so that I was finding it difficult to locate up to date Laravel 4 discussions on the topic.

So in case you are as thick as I am, here it is, all spelled out for you.

Important First Step: Set the timezone in app/config/app.php to your preferred timezone (or leave it at UTC if you want) keeping in mind that you will never change this, and you will never do something terrible like Config::set(‘app.timezone’, Auth::user()->timezone); anywhere in your application.

Using the following users table as an example, assume that we want to show foobazed_at to the user using their selected timezone:

CREATE TABLE `users` (
  `id` int(10) unsigned NOT NULL AUTO_INCREMENT,
  `username` varchar(255) NOT NULL,
  `locale` varchar(255) NOT NULL DEFAULT 'en',
  `timezone` varchar(255) NOT NULL DEFAULT 'America/Toronto',
  `foobazed_at` timestamp NOT NULL DEFAULT '0000-00-00 00:00:00',
  `created_at` timestamp NOT NULL DEFAULT '0000-00-00 00:00:00',
  `updated_at` timestamp NOT NULL DEFAULT '0000-00-00 00:00:00',
  `deleted_at` timestamp NULL DEFAULT NULL,
  PRIMARY KEY (`id`),
) ENGINE=InnoDB;

Laravel by default converts created_at, updated_at, and deleted_at columns to instances of Carbon, which, not knowing what Carbon was at the time didn’t mean a whole lot to me. Well, let me tell you… Carbon is awesome.

Instead of doing the following to display the created_at date (which will show the date in the default application timezone):

echo User::find(1)->created_at;

You can simply do this to get created_at in the users own preferred timezone:

echo User::find(1)->created_at->timezone(Auth::user()->timezone);

This is all well and good for the default columns, but what about our foobazed_at date? Easy. In your model (in this case the User model at app/models/User.php) add the following method:

public function getDates()
{
    return array('foobazed_at', static::CREATED_AT, static::UPDATED_AT, static::DELETED_AT);
}

That’s it! Any time you want to display foobazed_at you can simply do this:

echo User::find(1)->foobazed_at->timezone(Auth::user()->timezone);

I hope this is useful to someone else.

Getting A Trip Into BlackBerry Travel from TripCase

bb10travel BlackBerry Travel is one of my favourite BlackBerry applications of all time. Even when I had my BlackBerry Bold 9900 (which I had a rather strong disliking for), BlackBerry Travel kept me smiling. Needless to say I was delighted when they brought it to BlackBerry 10. I get lost without this application when I travel, literally.

For iOS and Android users that don’t know the awesomeness of BlackBerry Travel, they have TripCase. TripCase seems just fine, I’m sure they have an equally enthusiastic fan base. Unfortunately there isn’t a BlackBerry 10 version, which is fine because I use BlackBerry Travel.

Okay… so the problem is that I recently received an American Airlines flight itinerary directly into TripCase, and there wasn’t an obvious way for me to e-mail myself the itinerary. This means the trip wouldn’t get added to BlackBerry Travel, thus I would end up lost.

To solve this:

  1. Log into the TripCase web interface, and select your trip.
  2. Click the big “Share Itinerary” button at the top.
  3. Add one of your own alternative e-mail addresses (in my case I used GMail’s awesome +whatever trick), and be sure to check off the “Share Itinerary” checkbox.
    share-itinerary
  4. Once you receive the shared TripCase itinerary e-mail, forward it to [email protected] from your real BlackBerry Travel e-mail address.

Within a few minutes if all goes well, your TripCase itinerary will now be in BlackBerry Travel. Now you won’t get lost! Happy travels.